
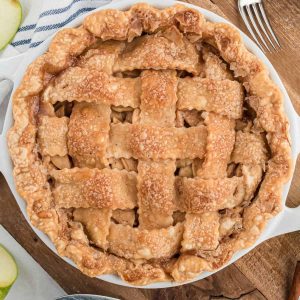
BEST Recipe for Apple Pie
This post may contain affiliate links, read our disclosure policy.

Our time-tested apple pie recipe is a true masterpiece – yet is super easy to make. Your friends will think you’re a master baker. Only you will know the truth of how easy this pie recipe is.

Easy Apple Pie
I’ve cherished this family classic for years, and let me tell you, it’s a breeze to create. What sets it apart from the rest? A luscious creamy caramel sauce that transcends ordinary crusts and elevates every bite.
Apple pie isn’t just reserved for Thanksgiving and Christmas; this versatile recipe is your ticket to the best apple pie you’ve ever had. We’ll walk you step-by-step to recreate it with ease at home.
Best Apple Pie Ingredients

- pie crusts – you’ll need two, one for the pie and one for the top crust
- apples – Granny Smith are what we like in this recipe
- butter – unsalted
- flour, water – this is used in the caramel
- white and brown sugar – this will help create the caramel
- cinnamon and nutmeg – perfect apple seasonings
- vanilla – use a good-quality vanilla extract
Best Apples for Apple Pie
A common question is what is the best type of apple to use in an apple pie. While technically you can use any apple, it’s well known that Granny Smith apples are considered the best type to use in apple pie recipes.
Other varieties to consider are:
- Jonagold (one of our favorites for pie and apple sauce)
- Honeycrisp
- Golden Delicous
- Rome
Bob’s Red Mill has a great list of apple varieties with descriptions that you might find helpful.
How to Make Homemade Apple Pie

- Preheat oven to 425 degrees
- Peel, core, and slice apples.
- Place one of the pie crusts in a sprayed pie pan and add the apples, creating a mound.
- Prepare lattice design for top pie crust. Set aside.
- Melt butter in a saucepan over medium heat. Stir in flour to form a paste. Add water, white sugar and brown sugar, and bring to a boil. Reduce temperature and let simmer. Add cinnamon, nutmeg, and vanilla. Stir to combine and remove from heat and let cool down a bit.
- Pour ½ of the sugar and butter liquid over the apples and add the lattice crust on top. Slowly pour remaining sugar mixture over crust, letting it seep into the openings.
- Bake 15 minutes in the preheated oven. Reduce the temperature to 350 degrees F and continue baking for 35 to 45 minutes, until apples are soft. (Note: place a cookie sheet on the rack beneath the pie in case there is any runoff.)
- Move pie to bottom oven rack if the top crust is getting too done.
How to Serve Homemade Apple Pie
We like to serve this pie warm with a scoop of vanilla ice cream or whipped cream on top.
You can eat it at room temperature if you like.

More Like This Recipe for Apple Pie
Best Apple Pie Recipe FAQs
Many recipes recommend pre-cooking the apples before putting them into the pie crust. This can help reduce the space between the crust and the apples, but isn’t always necessary.
This recipe doesn’t cook the apples prior to baking.
Yes, this pie should be refrigerated if you’re not planning to consume it immediately after baking. Store your apple pie in the refrigerator within 2 hours of baking. Make sure it’s covered with plastic wrap or aluminum foil to keep it from drying out or absorbing other odors in the fridge.
The best way to reheat the pie is in the oven. Preheat your oven to 350°F, place the pie on a baking sheet, and cover the edges with foil to prevent over-browning. Reheat for about 15-20 minutes or until the filling is heated through. Alternatively, you can microwave individual slices for a few seconds, but the crust may become less crispy.
While technically you could slice the apples with the peels on, the pie will be too fibrous and chunky. The apples won’t soften enough for this pie recipe.
Prebaking the bottom crust, also known as blind baking, is not typically necessary for most apple pie recipes. However, if you’re dealing with a particularly juicy filling, you can prebake the crust for a short time (about 10 minutes) to help prevent it from becoming soggy. You’ll need to use pie weights or beans on top of the crust so the crust doesn’t bubble up while cooking.
Opt for firm apple varieties like Granny Smith, Honeycrisp, or Braeburn, which hold their shape and offer a nice balance of sweetness and tartness for a perfect pie filling.
Apples that are overly soft or mealy, like Red Delicious, are not the best choice for apple pie. These apples can turn mushy when baked.
Yes, if you discover that your apple pie is undercooked, you can certainly put it back in the oven to finish baking. Cover the edges with foil to prevent over-browning, and continue baking at the original temperature until the filling is bubbling, and the crust is golden brown. Keep a close eye on it to avoid overcooking.

Best Apple Pie
Ingredients
- 2 9 -inch pie crusts
- ½ cup butter unsalted
- 3 Tablespoons flour
- ¼ cup water
- ½ cup white sugar
- ½ cup light brown sugar packed
- ½ teaspoon cinnamon
- ¼ teaspoon nutmeg
- 1 teaspoon vanilla extract
- 7-8 medium Granny Smith apples peeled, cored and sliced
Instructions
- Preheat oven to 425 degrees
- Peel, core, and slice apples.7-8 medium Granny Smith apples
- Place one of the pie crusts in a sprayed pie pan. Add apples, creating a mound.2 9 -inch pie crusts
- Prepare lattice design for top pie crust. Set aside.
- Melt butter in a saucepan over medium heat. Stir in flour to form a paste. Add water, white sugar and brown sugar, and bring to a boil. Reduce temperature and let simmer. Add cinnamon, nutmeg, and vanilla. Stir to combine and remove from heat and let cool down a bit.½ cup butter, 3 Tablespoons flour, ¼ cup water, ½ cup white sugar, ½ cup light brown sugar, ½ teaspoon cinnamon, ¼ teaspoon nutmeg, 1 teaspoon vanilla extract
- Pour ½ of the sugar and butter liquid over the apples and add the lattice crust on top. Slowly pour remaining sugar mixture over crust, letting it seep into the openings.
- Bake 15 minutes in the preheated oven. Reduce the temperature to 350 degrees F and continue baking for 35 to 45 minutes, until apples are soft. (Note: place a cookie sheet on the rack beneath the pie in case there is any runoff.)
- Move pie to bottom oven rack if the top crust is getting too done.
Notes
Nutrition
Did You Make This Recipe?
Don’t forget to share it with me on @thebalancingmom and follow on Tiktok @balancingmotherhood and Pinterest @thebalancingmom for more!


This is my 2nd time making this. Both times they turned out great. This will be the only way I make apple pie.
That’s wonderful! So glad to hear!